MOBILESTYLES APP ad banner and logo
MOBILESTYLES
FREE — On the App Store
Unlock
15% off
Download Now
Half Up Half Down Hairstyle

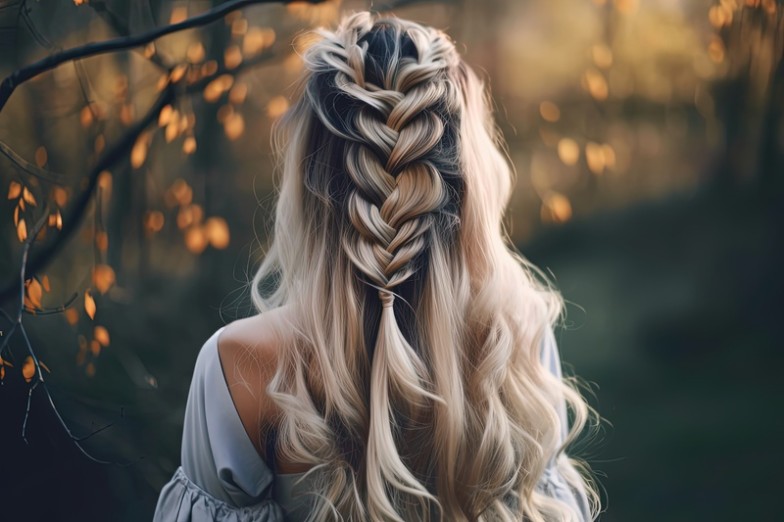
Perfect Textured Half Up Half Down Hairstyle Tutorial

How to Achieve a Textured Half Up Half Down Hairstyle

Looking for a fabulous hairstyle that keeps your hair out of your face while still showing off your beautiful locks?

The textured half up half down hairstyle is the perfect solution! This look is ideal for formal events or a chic everyday style. Let’s walk through each step to achieve this stunning look.

Looking for a fabulous hairstyle that keeps your hair out of your face while still showing off your beautiful locks? The textured half up half down hairstyle is the perfect solution! This look is ideal for formal events or a chic everyday style. Let’s walk through each step to achieve this stunning look.  Preparation for Half Up Half Down Hairstyle Before diving into styling, it’s essential to prep your hair properly. This ensures that your curls hold better and your hair looks fabulous throughout the day.  Step 1: Wet and Product Application First, lightly mist your hair with water to dampen it. Apply a thickening mousse and curl defining crème to help your curls hold better. Comb these products through your hair from the roots to the ends for even distribution.  How to Apply Products Effectively Mist your hair: Lightly spray your hair with water to dampen it.  Apply thickening mousse: Use a generous amount and work it through your hair, focusing on the ends and roots.  Comb through: Ensure the product is evenly distributed by combing through your hair.  Add curl defining crème: This product will help hold your curls and add definition.  Step 2: Blow Dry for Texture Once the product is applied, blow dry your hair. This adds volume and texture, essential for the half up half down style. For extra lift, use a texture iron at the roots, focusing on the crown area.  Tips for Blow Drying Section your hair: Divide your hair into manageable sections.  Use a round brush: This helps create volume as you blow dry.  Focus on the roots: Lift the roots while blow drying to add volume.  Use a texture iron: Add extra texture at the roots by using a texture iron, particularly in the crown area.  Curling Your Hair Creating beautiful curls is the heart of this hairstyle. Follow these steps for perfect curls every time.  Step 1: Backcomb and Hairspray Start at the base of your hair. Backcomb the roots and spray with a strong-hold hairspray. Brush through each section before curling to ensure smooth, voluminous curls.  Backcombing Technique Section your hair: Start at the base and work your way up.  Backcomb the roots: Use a fine-tooth comb to tease the roots.  Apply hairspray: Spray each section with a strong-hold hairspray.  Brush through: Smooth out the hair with a brush to prepare for curling.  Step 2: Curl in Sections Use a one and a quarter inch curling iron, curling all sections away from your face towards the center at the back. Hold the curls for a short time and leave the ends slightly straight for a modern look.  Creating Perfect Curls Divide your hair: Work in small sections for better control.  Curl away from the face: Always curl away from your face for a flattering look.  Hold briefly: Do not hold the curling iron too long to avoid damaging your hair.  Leave ends straight: For a modern touch, leave the ends of your curls straight.  Step 3: Mohawk Section Section out the crown and sides. Start with the mohawk section, over-directing each row forward and spraying the roots with Volume Spray 25 before blow-drying. This technique avoids excessive backcombing and maintains a softer look.  Styling the Mohawk Section Section the crown and sides: Keep these sections separate for now.  Focus on the mohawk: Start with the front and move backward.  Over-direct forward: Pull each section forward while applying hairspray.  Blow-dry roots: Dry the roots to set the volume in place.  Finishing Touches Now that your curls are set, it’s time to pull everything together into the perfect half up half down style.  Step 1: Wraparound Curls for Volume For more lift at the roots, switch to wraparound curls. Hold the curling iron barrel from front to back to create more flattering waves around the face. This technique adds movement and volume at the crown.  Adding Wraparound Curls Switch curling technique: Use wraparound curls for the top sections.  Hold barrel front to back: This creates more lift and volume.  Focus on the roots: Ensure the curls start close to the roots for added height.  Create movement: This technique adds natural-looking movement to your hair.  Step 2: Styling and Pinning Once curled, leave out the front sections, about two inches from the ears. Use a mirror to shape the crown, keeping it tousled. Pin the hair in place and use a medium-hold spray to manage frizz and add detail.  Pinning and Shaping Leave out front sections: This adds a soft, romantic touch to the style.  Use a mirror: Shape the crown using a mirror for a balanced look.  Pin in place: Secure the top section with bobby pins.  Manage frizz: Use a medium-hold spray to tame any flyaways.  Step 3: Final Touches Bring the front pieces back separately for a gentle overlay on top. This adds detail and finesse to your hairstyle. Use hairspray to finish and secure your look.  Completing the Style Separate front pieces: Handle the front sections gently for a detailed finish.  Overlay on top: Lay the front pieces gently over the top section.  Detail the look: Make any final adjustments for symmetry and style.  Final spray: Use a final mist of hairspray to set your hairstyle.  Conclusion With these steps, you’ll master the textured half up half down hairstyle, perfect for any occasion. For professional styling services, consider using MOBILESTYLES, an appointment app connecting you with expert beauty professionals at your convenience. Whether you need a quick touch-up or a complete makeover, MOBILESTYLES has you covered.  Transform your look with the perfect textured half up half down hairstyle today!

Preparation for Half Up Half Down Hairstyle

Before diving into styling, it’s essential to prep your hair properly. This ensures that your curls hold better and your hair looks fabulous throughout the day.

Step 1: Wet and Product Application

First, lightly mist your hair with water to dampen it. Apply a thickening mousse and curl defining crème to help your curls hold better. Comb these products through your hair from the roots to the ends for even distribution.

How to Apply Products Effectively

  1. Mist your hair: Lightly spray your hair with water to dampen it.
  2. Apply thickening mousse: Use a generous amount and work it through your hair, focusing on the ends and roots.
  3. Comb through: Ensure the product is evenly distributed by combing through your hair.
  4. Add curl defining crème: This product will help hold your curls and add definition.

autumn hairstyle

Step 2: Blow Dry for Texture

Once the product is applied, blow dry your hair. This adds volume and texture, essential for the half up half down style. For extra lift, use a texture iron at the roots, focusing on the crown area.

Tips for Blow Drying

  1. Section your hair: Divide your hair into manageable sections.
  2. Use a round brush: This helps create volume as you blow dry.
  3. Focus on the roots: Lift the roots while blow drying to add volume.
  4. Use a texture iron: Add extra texture at the roots by using a texture iron, particularly in the crown area.

autumn hairstyle

Curling Your Hair

Creating beautiful curls is the heart of this hairstyle. Follow these steps for perfect curls every time.

Step 1: Backcomb and Hairspray

Start at the base of your hair. Backcomb the roots and spray with a strong-hold hairspray. Brush through each section before curling to ensure smooth, voluminous curls.

Backcombing Technique

  1. Section your hair: Start at the base and work your way up.
  2. Backcomb the roots: Use a fine-tooth comb to tease the roots.
  3. Apply hairspray: Spray each section with a strong-hold hairspray.
  4. Brush through: Smooth out the hair with a brush to prepare for curling.

Step 2: Curl in Sections

Use a one and a quarter inch curling iron, curling all sections away from your face towards the center at the back. Hold the curls for a short time and leave the ends slightly straight for a modern look.

autumn hairstyle

Creating Perfect Curls

  1. Divide your hair: Work in small sections for better control.
  2. Curl away from the face: Always curl away from your face for a flattering look.
  3. Hold briefly: Do not hold the curling iron too long to avoid damaging your hair.
  4. Leave ends straight: For a modern touch, leave the ends of your curls straight.

Step 3: Mohawk Section

Section out the crown and sides. Start with the mohawk section, over-directing each row forward and spraying the roots with Volume Spray 25 before blow-drying. This technique avoids excessive backcombing and maintains a softer look.

Styling the Mohawk Section

  1. Section the crown and sides: Keep these sections separate for now.
  2. Focus on the mohawk: Start with the front and move backward.
  3. Over-direct forward: Pull each section forward while applying hairspray.
  4. Blow-dry roots: Dry the roots to set the volume in place.

autumn hairstyle

Finishing Touches

Now that your curls are set, it’s time to pull everything together into the perfect half up half down style.

Step 1: Wraparound Curls for Volume

For more lift at the roots, switch to wraparound curls. Hold the curling iron barrel from front to back to create more flattering waves around the face. This technique adds movement and volume at the crown.

Adding Wraparound Curls

  1. Switch curling technique: Use wraparound curls for the top sections.
  2. Hold barrel front to back: This creates more lift and volume.
  3. Focus on the roots: Ensure the curls start close to the roots for added height.
  4. Create movement: This technique adds natural-looking movement to your hair.

autumn hairstyle

Step 2: Styling and Pinning

Once curled, leave out the front sections, about two inches from the ears. Use a mirror to shape the crown, keeping it tousled. Pin the hair in place and use a medium-hold spray to manage frizz and add detail.

Pinning and Shaping

  1. Leave out front sections: This adds a soft, romantic touch to the style.
  2. Use a mirror: Shape the crown using a mirror for a balanced look.
  3. Pin in place: Secure the top section with bobby pins.
  4. Manage frizz: Use a medium-hold spray to tame any flyaways.

Step 3: Final Touches

Bring the front pieces back separately for a gentle overlay on top. This adds detail and finesse to your hairstyle. Use hairspray to finish and secure your look.

autumn hairstyle

Completing the Style

  1. Separate front pieces: Handle the front sections gently for a detailed finish.
  2. Overlay on top: Lay the front pieces gently over the top section.
  3. Detail the look: Make any final adjustments for symmetry and style.
  4. Final spray: Use a final mist of hairspray to set your hairstyle.

Conclusion

With these steps, you’ll master the textured half up half down hairstyle, perfect for any occasion. For professional styling services, consider using MOBILESTYLES, an appointment app connecting you with expert beauty professionals at your convenience. Whether you need a quick touch-up or a complete makeover, MOBILESTYLES has you covered.

Transform your look with the perfect textured half up half down hairstyle today!

Share:

Download the style that comes to you!

The #1 on-demand health and beauty app connecting you with local, vetted PROs.

  • Available Nationwide
  • 100s of services to choose from
  • Your time, your place

With MOBILESTYLES a good time is any time.

Home page with most recent and trending PRO services provided